This section of the guide is out of date.
Freedom2Roam has now been released and replaces RAv3. Guidance on configuring Freedom2Roam is available here.
To allow advanced users, such as Nominated Contacts, full VPN access across the entire network or part of the network, create a separate group for them then select that group and click on the Networking tab.
This option can also be used when school-issued Windows devices are given to staff for working at home. Such devices can be configured to allow staff to connect directly to a school's domain controller when they log into the device via a VPN. Full details are found here.
Click on the tick box to Enable advanced networking for this group to grant full access.
Once this box has been ticked, the remaining settings options on the page will become available.
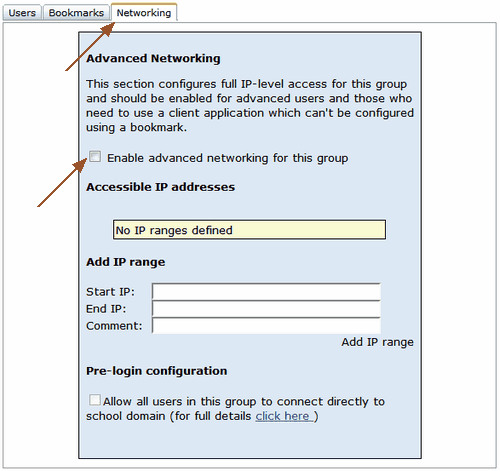
Configuring advanced networking settings
If you have enabled advanced networking for a group, you will need to configure a range of IP addresses that can be accessed by the relevant user group.
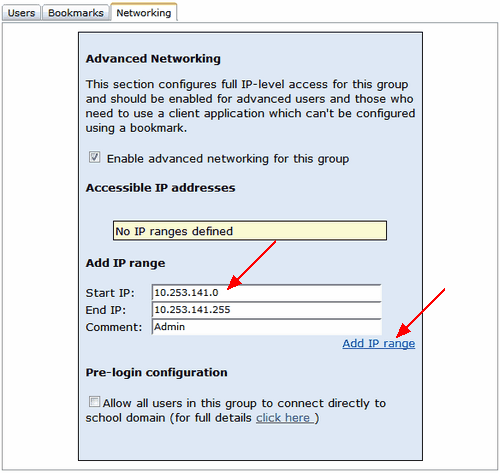
Enter the IP range and click Add. The IP range will then be listed and you can add other sets of IP addresses if needed. Click Add after each one.
If you attempt to enter what you believe to be a valid IP range and receive an error message preventing you from entering it, this is likely to be because Wavenet Education does not have a record of your school's IP range in the database.
If this occurs, please raise a case with the support desk to provide Wavenet Education with the details. Once the database is updated with this information you will be able to specify the required IP range for the Advanced Networking functionality to work.
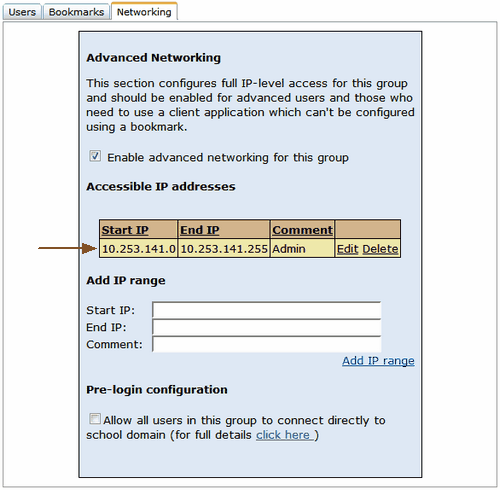
Users whose group has had advanced networking enabled will be able to access anything that falls within the defined IP address range.
When the users in this group log in to the RAv3 website and download the Cisco AnyConnect client via the interface, that client will get configured with the IP ranges specified here.
The users in this group would then use built-in Windows RDP (Remote Desktop) client to access one of the specified IP addresses.
Pre-login configuration allows users to log in to your school's domain directly even when outside the network. Full details are found here.
For users who have advanced networking access, local school-based DNS settings can also be configured.
This is not a requirement but is useful in accessing school-specific URLs. If DNS settings are not specified, users will need to enter an IP address instead to access school-specific locations.
How the DNS settings can be used
Configuring your internal DNS settings in the RAv3 interface will also allow any staff member to use RDP to access school-based machines whose IP addresses are not fixed. This method would be used instead of the bookmarking method described here.
To be able to access school machines in this way:
1.The Nominated Contact would need to enable Advanced networking for the group using this functionality
2.The Nominated Contact would need to specify the IP range which includes the destination machines for the group
3.The end user would need to log in to the RAv3 website in the first instance and download/install the Cisco AnyConnect client on their home machine. the user would never need to access the RAv3 website again after this is done.
4.The end user would then need to launch the Cisco AnyConnect client and establish the connection to the school's network by clicking Connect.
5.The end user would then need to launch the RDP client installed on their Windows or Apple computer and in the field where they are required to enter the computer details, instead of an IP address they would enter their school computer's name, followed by the internal DNS suffix. The address would then look something like this: myschoolcomputer.myschool.internal
6.The end user should then be able to access the login screen for their computer and can log in using the credentials they would normally use to log into the school machine.
See also: