This section of the guide is out of date.
Freedom2Roam has now been released and replaces RAv3. Guidance on configuring Freedom2Roam is available here.
Available resources refer to the locations that users can access once they have successfully logged in.
You will need to configure accessible locations for all groups.
Defining types of connections
To define types of connections and what they can access inside the school network, click on Select to the left of the group's name and edit its settings.
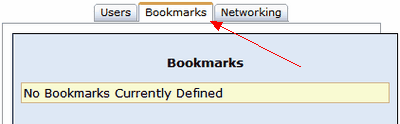
Then click on the Bookmarks tab. For a brand new group nothing will be listed.
Users can be allowed to access different types of resources remotely, each of which needs to be correctly configured.
Users are given access via bookmarks that you must configure. These are shown to users as normal web links in the front end.
Select the resource type you wish to configure for remote access.
To configure what you want to make available, select the relevant resource type, one at a time, from the Type dropdown menu under the Add bookmark heading.
Bookmarks are links that will be presented to the end-user as choices of services that they are able to access.
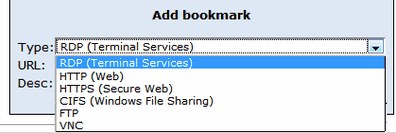
Definitions of the available options are as follows:
RDP (Terminal Services): Provides a web-based remote desktop connection.
This option gives users a connection to the desktop of their school-based (fixed-IP) computer via a web browser. Users do not need to connect via the Remote Desktop application provided by Windows but the destination computer must have incoming connections enabled. The destination computer must also be left ON.
Once the link to an IP address is configured and saved, users access their computer by clicking on a standard web link displayed to them when they log in to the front end of the remote access website (https://rav3.lgfl.org.uk or https://rav3.trustnet.pro). For details on how this works, please see the end user guide.
HTTP (Web): Can be used to configure access to internal sites such as a staff intranet.
HTTPS (Secure Web): Can be used to configure access to secure internal sites.
For both of the above, you must select the relevant option and then enter the web address of each one. Click Add after each one to continue adding as many links as needed.
CIFS (Windows File Sharing): Gives access to defined network shares and the files stored in those locations.
CIFS (Common Internet File System) allows users to work with remotely located files by linking them to a share on the local AD where those files are located.
If the names of the shares used in your school's AD (Active Directory) environment are the same as the USO ids of the users (if you have USOSync installed, for example), you do not need to configure individual CIFS links for each user. Instead, links to shares can be created using a single setting for all users, where a generic string can be used in the address of the share. The generic string will then be substituted by the specific user's USO username when accessed.
The following string:
CSCO_WEBVPN_USERNAME
can be used at the end of the address so that it appears as \\yournetworklocation\CSCO_WEBVPN_USERNAME. This will then be replaced by \\yournetworklocation\username when accessed by each user. This will allow users to get to their personal shares without you having to configure it individually for each user.
 Please note: If your home directory is a hidden share then you will need to add the $ symbol at the end of the string shown above.
Please note, access to CIFS is generally possible when using IE10 or below, or a different make of browser.
FTP (File Transfer): Gives users the ability to transfer files by connecting to the server via FTP
VNC (Virtual Network Computing): Can be used to configure remote desktop access for users needing to log into a computer running Mac OS X (10.4 or later) or a Linux operating system, for example. Can also be used with Windows operating systems instead of RDP if it is preferred.
This type of access can also be used in support situations where an advanced user can remotely log into someone's computer and the end user can see the remotely controlled mouse movements on their screen.
Please note that a VNC server application will need to be installed and configured on the destination computer. These can be freely obtained.
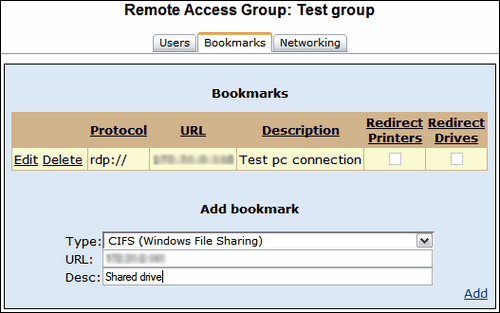
Select the required type of resource from the dropdown menu and configure them one at a time. You can add as many connection types as required.
In the URL field enter the IP address of the destination server/resource and a path (if required).
In the Description field enter a user-friendly name stating what the location is. This is what the users will see as the link in the front end so it needs to be a meaningful name (ie Intranet, Home folder, etc)
After configuring each link click Add in the lower right corner to add it to the list of Bookmarks. This saves it for the group. No additional saving is required.
Follow the same process for each additional bookmark.
For RDP connections only
Moving files
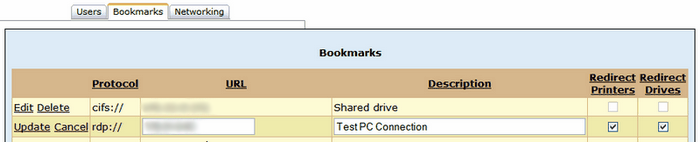
When connecting via the RDP bookmark it is possible for users to move files between the remote machine and the C drive of their local computer. It is also possible to print files from the remote location using a local printer (such as a home printer). Please note however that not all printers support this function and only directly connected printers (not network printers) are supported by the RDP service.
To enable this functionality, click Edit next to the RDP connection after it has been created. This activates editing in the selected row and allows you to make changes to all fields. To enable sharing with local devices select the tick boxes in the Redirect Printers and/or Redirect Drives columns. Click the Update link in the left-hand column to save changes.
Additional configuration options for Remote Desktop protocols
There are two types of technology that may be used when accessing a server using the Remote Desktop protocols: ActiveX or a Java client.
ActiveX
When using Internet Explorer on a PC, the user will be given the option of using ActiveX to enable the connection. This technology is able to adjust screen sizes and resolution intelligently, allowing the maximum resolution to be enabled on the user's machine.
Java
If the ActiveX option is refused or not offered (if a browser other than Internet Explorer is used, for example) then a Java client is run.
This results in a minimum default screen size being displayed that many users will find too restrictive. To overcome this, one or more bookmarks containing screen size parameters may be created for the user. The user may then choose which bookmark to use, depending on the screen resolution supported by their computer.
The parameters that may be added are as follows:
geometry - size of the client screen, WxH. To start the applet in Full Screen mode use this parameter depending on your screen size, eg: 'geometry=1024x768'.
bpp - bits per pixel (color depth - 8, 16, 24 or 32). The default value is the lesser value of the following: 24 or the colour depth of the operating system when it starts.
For example, a bookmark for the user might be entered as follows:
rdp://172.31.0.132/?geometry=1280x1024&bpp=32
Note that the first additional parameter is preceded by a query (?) and the second parameter (if needed) requires a preceding '&'.
See next:
See also: