Pre-requisites
 A school must be exporting data via USO-AutoUpdate AND have the Atomwide Attendance report enabled in the AutoUpdate settings page of the support site. The school must also be exporting attendance data daily in order to be able to use this functionality.
Attendance data exports should be scheduled to run at a specified time or times each day, after the day's (or morning and afternoon) attendance has been entered into the MIS.
This export is independent of the full MIS data exports which generally run overnight.
A school can choose to be notified after the latest attendance export has been processed and is ready to use for sending absence notifications.
The person responsible for sending absence notifications (ie with SMS Sender USO profile) can have an additional profile setting added to their USO account. The Role of Attendance Officer can be added to the person's account which will ensure that the Attendance Officer receives an automated email informing them when the exported attendance data has been processed and is ready for use.
Accessing absence data
Once data has been processed, the SMS Sender/Attendance Officer can find out if there are any pupils absent that day by going to AutoText > Send messages then selecting the Pupil Attendance tab in the Send to box.
If there are no absences on a given day, the message you see will inform you of this.

The Pupil Absence tab can only be used to find absent pupils and text their contacts on the day on which they are absent.
You cannot use this to inform contacts of absence on previous days. If you need to inform contacts of a previous absence or another issue you will need to find them via other methods. See sending messages to pupil contacts.
If there are pupils absent the day you access this interface, you will see a list of the pupils' names.
Whether you see their contacts' names and details depends on whether you have the view secure MIS data permissions enabled in your USO account profile.
Certain year groups can be excluded from the results via the options selected on the Configure settings page. The absence alerts opt-out settings (on the right in the green-bordered box) can be changed on this page without affecting the default settings. It will merely produce a different set of results with either more or fewer names depending on which years are included or excluded. The results will change as soon as you click Update Absence List.
If absent pupils are found, their names and their primary contacts' names will be shown in the results and you will be able to send the contacts a text message.
Pre-defined message text will appear in the text box. The words in brackets will be replaced by the names of contacts when the message is sent. The pre-defined content of the text message can only be changed by raising a support case and specifying the replacement text, although the default content of any message can still be edited (for example, to reflect an afternoon period of reporting) directly on the page immediately before sending.
Tick or untick the boxes next to the names of pupils whose contacts you want to text. Alternatively, click the Deselect All button at the bottom of the page and then tick only selected recipients.
Above the list of contacts is a dropdown menu that allows you to see morning or afternoon absences or both. The list generated will reflect pupil absence for the chosen time frame only. If you select the last option, Absent for AM or PM session or both, an additional column will appear in the list specifying the time absence was recorded.
Please note for AM and PM absence lists to be generated, a school must export attendance data twice daily.
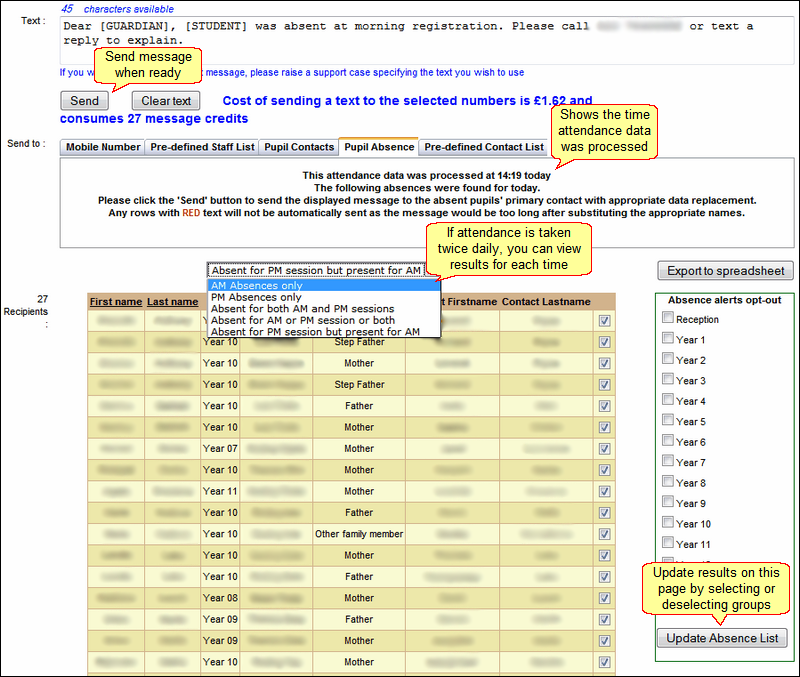
Hovering your mouse over a particular row in the results table will display the message that will be sent to that person.
When you are happy with the message recipients, click Send.
Dropdown menu options for viewing attendance data
AM Absences only
Selecting this option will display only those pupils who were absent at morning registration and allow you to send an alert to their parents/guardians.
PM Absences only
Selecting this option will display only those pupils who were absent at afternoon registration and allow you to send an alert to their parents/guardians.
This may turn out to be the same, or larger, list of pupils as the one for AM absences so if you send the alert again, the contacts of most of these pupils will receive 2 absence notifications in a single day.
Absent for both AM and PM sessions
Selecting this option will display the pupils marked as absent at both morning and afternoon sessions. This option can only be used after both sets of attendance data have been exported and a single message can then be sent to cover both absences.
Absent for AM session or PM session or both
Selecting this option will display the pupils marked as absent at EITHER the morning or afternoon session AND it will also display those pupils marked absent at BOTH sessions. All contacts for these pupils will receive a single message regardless of whether the pupil was absent during just morning or afternoon registration or was absent for the entire day.
Absent for PM session but present for AM
Selecting this option will display only those pupils marked absent at afternoon registration but present during the morning registration. You can then notify these pupils' contacts about their afternoon absence. This assumes that any pupils who were absent during the morning session have already had alerts sent to their contacts and prevents those individuals from receiving a second notification on the same day.
Unsent text messages
Because a text message can contain only 160 characters, some messages will become too long when the parent's name is substituted within the brackets. When this happens, you will be informed about which messages have failed to be sent.
It is important that at this point you do NOT use either the Back button or the Refresh button in your browser to return to the original page as this will have an undesired effect. The messages that have managed to be sent will be sent again to the same recipients while the un-sent ones will remain un-sent.
Instead, you should view the un-sent messages using the link provided, edit the individual message text and send those messages individually (as described below). If you do want to return to the previous page view (before you clicked the Send button) use the Return button provided below the list of un-sent messages, not the browser's Back button.
A message stating the number of unsent messages will appear above the line informing you of how many message credits the school has. It is likely these are messages that have exceeded the character limit due to the recipients' names being longer than average.

Click the link to be taken to the list of unsent messages. You will be able to amend the text of the unsent message(s) individually and try sending again.

The column to the left of the message shows the number of characters it contains. You will need to amend the message so that it does not exceed 160 characters.
Click Send to the right of the message to send it again.
See also:
Send messages to a mobile number
Send messages to a pre-defined staff list
Send messages to pupil contacts