The management page in the support site is accessible only to Nominated Contacts who are associated with a school where an LGfL wireless network has been installed.
The functionality provided can be used to create temporary guest user accounts that allow wireless devices to connect to a school's wireless network.
To set up your wireless network names (SSIDs) you will need to tell Wavenet Education what you want these to be at the time the wireless access points are configured.
Once the details are configured, you can manage your network access via the tabs available on this page.
Guest users tab
This is used to create guest accounts each time such accounts are needed.
Simply define which part of your wireless network they can connect to and for how long the account should remain valid.
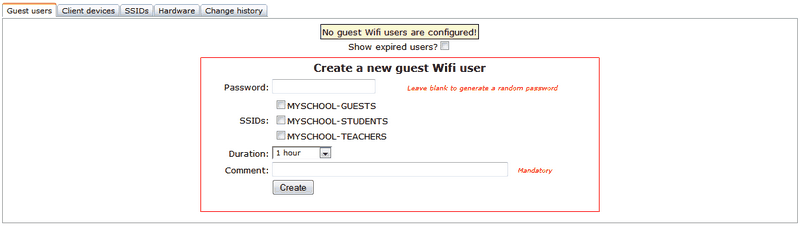
Guest accounts need to be created one at a time by filling in the required fields.
Password field: Either enter a password for the user or leave the field blank and a random password will be assigned by the system. If you specify a password it must contain a mixture of letters and numbers and be between 6 and 12 characters long. If the password entered does not meet these criteria then a different, suitable password will automatically be created.
SSIDs field: Select the network name you want the user to be able to access by ticking the box next to that name.
Duration field: Choose the account's life span from the dropdown menu. An account can be active for just a matter of hours, days or it can have an unlimited lifetime.
Comment field: This should contain a few words to explain/remind you of the purpose of this account.
Click Create when all details have been entered.
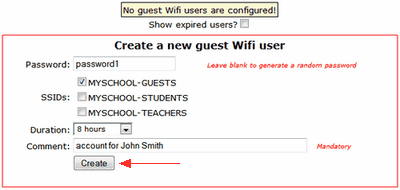
This action will create a new username and either the password you've specified or a random password if you leave this blank.
The guest user accounts will be listed in the page view.

You will then need to communicate the account credentials to your guest users.
By default, only active accounts will be displayed in the list.
If you need to see old, expired accounts tick the box next to Show expired users.
To delete an account, click the Delete link in the left-hand column.
Client devices tab
This section allows you to control wireless network access by granting accessing only to devices with specific MAC addresses.
User account details will be required in addition to MAC address access being allowed.
NOTE: In order to be able to add devices by their MAC address, at least one of the school's SSIDs needs to have MAC address control configured to the Yes setting. This is found and edited under the SSIDs tab. When this setting is correct, you will be able to add MAC addresses through the interface provided.
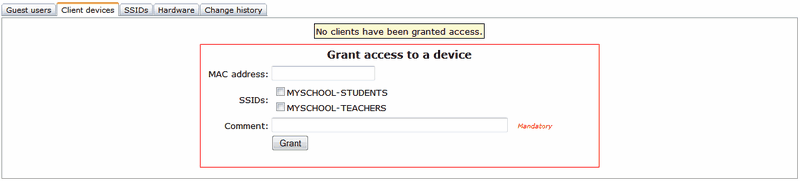
To add a device, enter its MAC address, then tick the box next to network you want it to be able to access and enter a comment about the device in the text box provided.
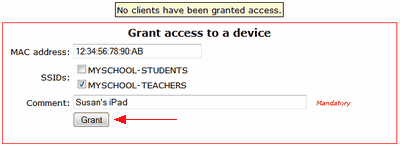
Click Grant.

All devices that have been granted access will appear in the list as they are added.
The list will show each device's MAC address, the network it has access to and the notes you've made to help you identify what that device is.
Use the Revoke link to stop a particular device from continuing to access your wireless network when this is no longer required.
SSIDs tab
This interface allows you to define the type of access allowed by each wireless network available within your establishment.
After the SSIDs have been created for you (based on your request), they will be listed under the SSIDs tab and you will be able to edit the type of access you would like each network to have.

To edit access type and MAC address control for an SSID click Edit.
Then select the access type from the available options in the dropdown menu.
Switch MAC address control on or off by ticking or unticking the box.
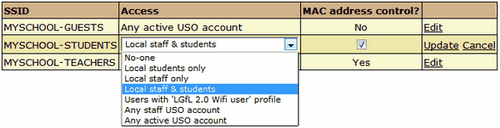
Click Update to save your preferences.
NOTE: if you need to control access to any SSID via MAC address, you need to switch the setting to Yes in this tab before you can add MAC addresses under the Client devices tab in this interface.
Hardware tab
The information displayed here will contain the MAC address of the wireless access points installed at your school. This is a read-only list for the network administrator.
When a new access point is purchased, it is configured by Wavenet Education and its MAC address is added to the list prior to shipping.

The "Label printer available" text refers to whether a school has purchased a particular label printer (available here) and licensed Wavenet Education's software. This software integrates with this Wifi management interface to allow you to easily print user ID labels for devices requiring wifi access.
Change history tab
This tab provides access to track all changes made to your wireless network configuration.
It will reflect changes made either by Wavenet Education or your local wifi administrators to allow everyone to see what changes where made, when they were made and by whom.

See also: