Creating bespoke mailing lists
Nominated Contacts and distribution list editors can create additional mailing lists to be used by their schools or the LA.
To create a list, click the Create a new list button at the bottom of the page.
The list creation interface will open, allowing you to specify the initial settings for the new list.
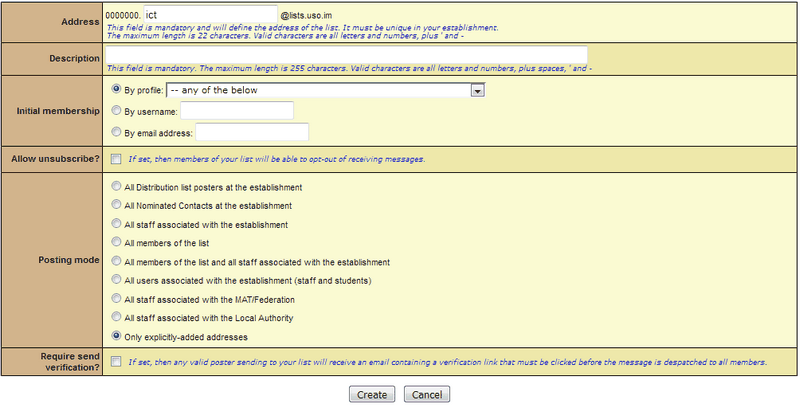
You will initially need to specify the following:
Address: the address of a mailing list will always start with the school's full DFE code. You then need to enter the name (up to a maximum of 22 characters) you want the list to have.
Its full address will then become 1234567.listname@lists.lgflmail.org for StaffMail users and 1234567.listname@lists.uso.im for users of all other types of email.
Description: the description field is mandatory and will be what StaffMail users see when the name of that mailing list is displayed in the Global Address List.
Initial membership: this determines the initial members of a list which can be modified later.
It is essential to decide at this stage whether any of the members of this list will need to be added by USO profile. If so, the By profile option should be selected and a profile group specified. Only one profile group can make up a list. If more than one is required, a request will need to be made to the Service Desk.
If you choose to start the initial membership of a list by username or email address you will not be able to add a USO profile group at a later stage. However, if you start the group membership by selecting a USO profile, you will be able to add individual members at a later date.
Allow unsubscribe: this setting can be changed later but will determine whether list members can opt out of being part of that mailing list. The process is described here.
Posting mode: this determines how the List Posters (people who are able to email each list) to this list are granted permission. You can change this to any of the other available options at any time after a list is created and you can always add other list posters who don't fit any of the available categories by entering their USO username or email address.
Require send verification: To ensure that the sender is valid and their email address has not been spoofed, each establishment can enable sender verification. If this is done, when an allowed sender posts something to a distribution list, they will receive a confirmation email to ensure they are truly the sender before the email is released to the intended recipients.
Click the Create button to finish the process.
Once a list is created it can be edited and used straight away.
However, for users of StaffMail, there will be a 24 hour period before a new list appears in the GAL for the school or LA.

Editing a mailing list your establishment has created
Once the mailing list has been created, click the Details link for that list to view the list, then click Edit to make changes to it.
It is possible to change the list address (the section after the DFE code only) for any lists you create yourself but not for automatically generated lists.
It is also possible to change the list description. This will only affect StaffMail users and will change how that list is described in the GAL. It is also possible to hide the list from the GAL altogether by ticking the Hide from StaffMail Global Address List box.
Adding members by profile or via a CSV file
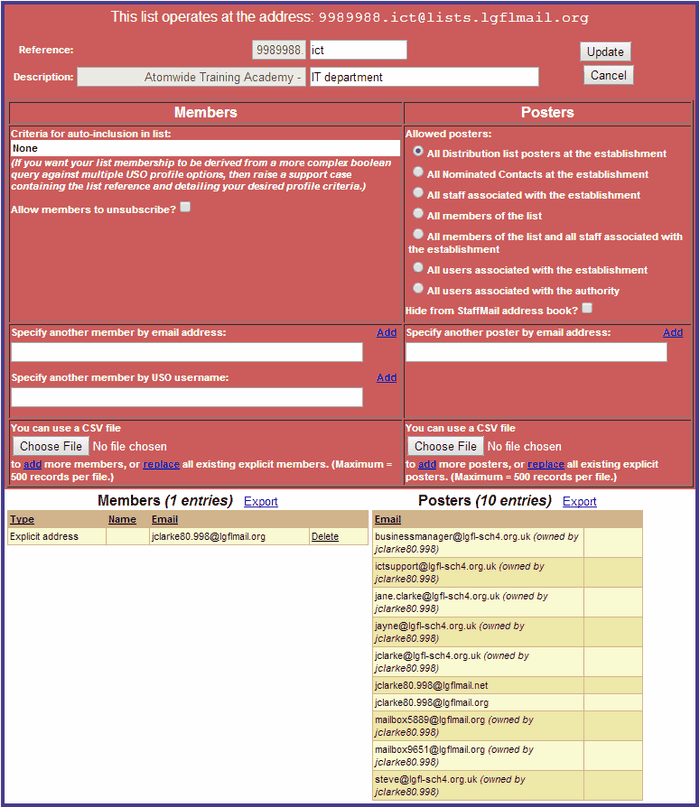
Regardless of whether the initial membership was based on USO profile or started with an individual member, you may add other members either by entering their email addresses (which can be from any domain) or their USO usernames. Enter each one into the relevant box and click Add.
Alternatively, you can create a CSV file listing each person either by USO username or email address (one per line) and uploading the file via this interface.
 The CSV file you create must contain one column only with one user per line, defined either by USO username or email address (so a first name and last name cannot be entered). If invalid characters such as spaces are found, the file will not be processed.
To upload the file click on the relevant link to specify whether you want to use the file to add more members or replace the existing members that have been added individually.
Allow members to unsubscribe
A tick-box decides whether list members can unsubscribe. This process is carried out via My Account >> Account details and can only be done by list members with a USO account.
Adding list posters
To specify people who are able to to post to the list, select one of the available radio buttons.
Alternatively, or in addition to, defining list posters via one of the available options, it is possible to make anyone, from any email domain, a poster to any list.
Such individuals can be added by entering their email addresses into the text box provided and clicking Add.
Adding list posters via a CSV file
Alternatively, email addresses can be added by placing a number of them in a CSV file, one address per line, and uploading that file.
To upload the file you must then click on the relevant link to specify whether you want to use this list to add more posters or replace the existing posters that have been added individually.
Please note that when a StaffMail user is given permission to be a List Poster, that person's lgflmail.org address and ALL associated aliases will be added so that individual can post to the list regardless of which alias is currently used as the From address.
Hiding a mailing list from the StaffMail Global Address List
For StaffMail users, any existing mailing lists will, by default, appear in the Global Address List. It is possible to keep them from appearing there by ticking the Hide from StaffMail Global Address List box when editing a list's properties. Once this box has been ticked, the mailing list will disappear from the StaffMail address book within 24 to 72 hours.
Deleting a mailing list
To delete a list your establishment has created, select that list by clicking on Details.
When the interface opens, click the Delete button.