Editing an automatically generated list
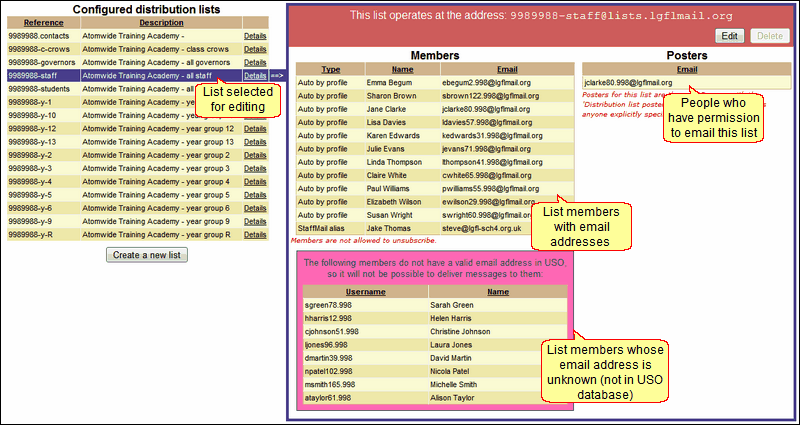
To edit any of the default mailing lists, click Details to the right of a list's description.
When a list is selected, the row containing it turns blue and the names and email addresses of all its members and posters are displayed in the right-hand section of the screen.
It will also highlight the names of people who have been added to that list by USO profile but who have NO email address registered to their USO account.
Each list also has its own unique address which will always be shown above the list of members and posters.
Click Edit in the top right corner of the red bar to make any allowed changes to the selected list.
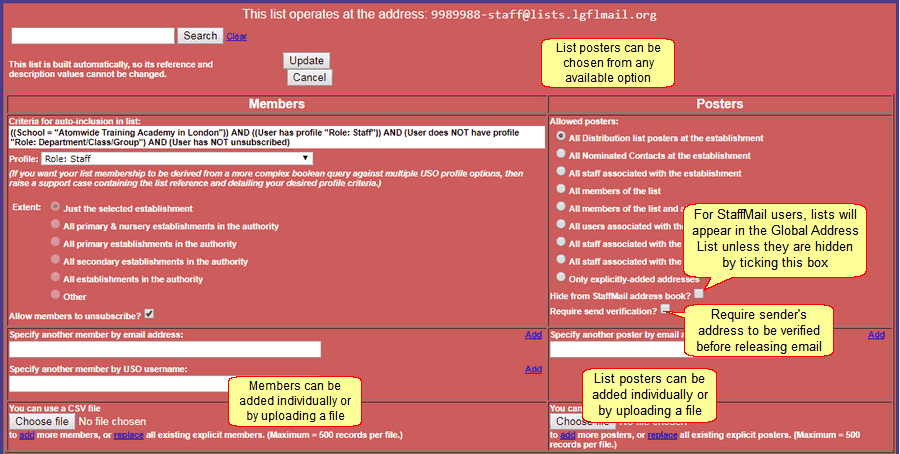
This opens the interface that will allow you to add members and posters to this type of list.
Adding list members by uploading a CSV file
Members of distribution lists are users who will receive any emails sent to the list.
Automated methods of adding members to auto-generated lists are disabled as the list is already based on a USO profile group.
However, individual members can be added explicitly, either by entering their email address (this can be an email address at any domain, including external ones) or a USO username if only this is known. Add one at a time into the appropriate box and click Add after each one.
Multiple members can be added at once by placing them in a single column CSV file either by email address or USO username, one per line, and uploading that file.
To upload the file you must click on the relevant link (below the upload box) to specify whether you want to use this list to add more members or replace the existing members that have been added individually.
Such members then get added to the list under the Type of Explicit address. These have a Delete link next to their names as they must be deleted individually (since this was how they were added).
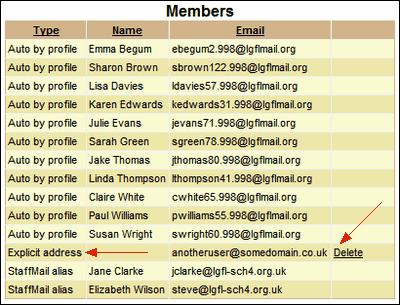
Any addresses added in this way can later be deleted from the list by clicking the Delete link. Members added automatically by USO profile cannot be deleted individually. However, members will be automatically removed from the list if they become unallocated from the establishment or if their USO profile changes.
Adding List Posters by options
It is possible to change the people defined as list posters to any list. Posters must be specified for each list individually.
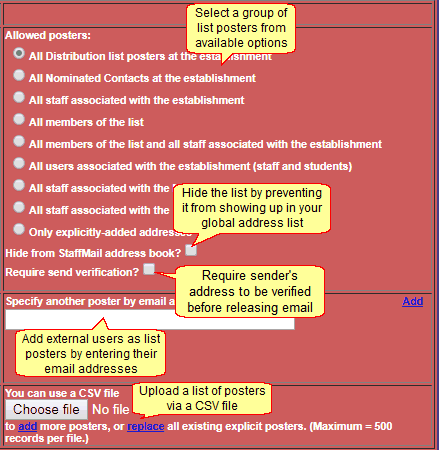
Under the Posters heading, you may change list posters either by selecting a different radio button.
Adding list posters via a CSV file
Alternatively, or in addition to, defining list posters via one of the available options, it is possible to make anyone, a poster to any list.
Such individuals can be added by entering their email addresses into the text box provided and clicking Add.
Alternatively, email addresses can be added by placing them in a CSV file, one address per line, and uploading that file.
 The CSV file you create must contain one column only with one user per line, defined either by USO username or email address (so a first name and last name cannot be entered). If invalid characters such as spaces are found, the file will not be processed.
To upload the file you must then click on the relevant link to specify whether you want to use this list to add more posters or replace the existing posters that have been added individually.
After all the necessary changes have been made, click the Update button at the top of the page to ensure that all changes are saved.
Please note that when a StaffMail user is given permission to be a List Poster, that person's lgflmail.org address and ALL associated aliases will be added so that individual can post to the list regardless of which alias is currently used as the From address.

Hiding a mailing list from the StaffMail Global Address List
For StaffMail users, any existing mailing lists will, by default, appear in the Global Address List. It is possible to keep them from appearing there by ticking the Hide from StaffMail address book? box when editing a list's properties. Once this box has been ticked, the mailing list will disappear from the StaffMail address book within 24 to 72 hours.
Sender address verification
If the box called Require send verification is ticked for a particular distribution list permitted users trying to email that list will immediately receive an email from the system asking them to confirm that it was in fact them that initiated the email in question.
If the user clicks on the link to confirm it was them, the email will go out to the recipients.
If the user clicks on the alternative link to say it was not them, then the email will get deleted and will not go out to recipients. The user will receive another email from the system advising them on the various security precautions that can be taken.
See next: